Showing posts with label basing. Show all posts

Friday, 29 August 2025

Chaos Basing

Holiday season has been a pleasant slowdown from painting in the last few weeks. As a small filler post while I'm finishing up a few things, I thought documenting what I'd done on the basing for my Warriors of Chaos.

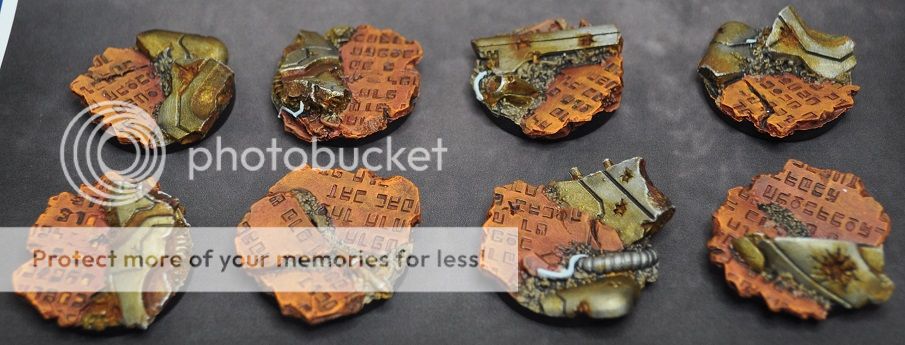
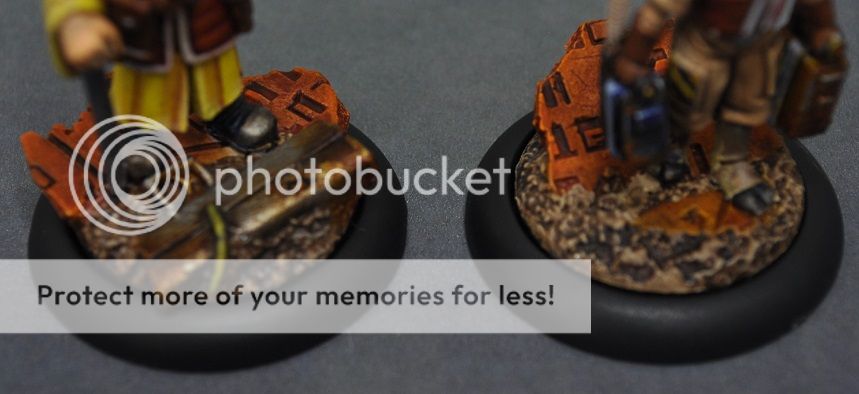
In the past I've had a tendency to overcomplicate life and come up with weird and wonderful schemes, so on the current armies I'm keeping it simple (stupid) to not get in my own way. In the previous post I mentioned that it's a few pieces of cork as rocks, some gravel and tiny stones, then sand atop everything. 

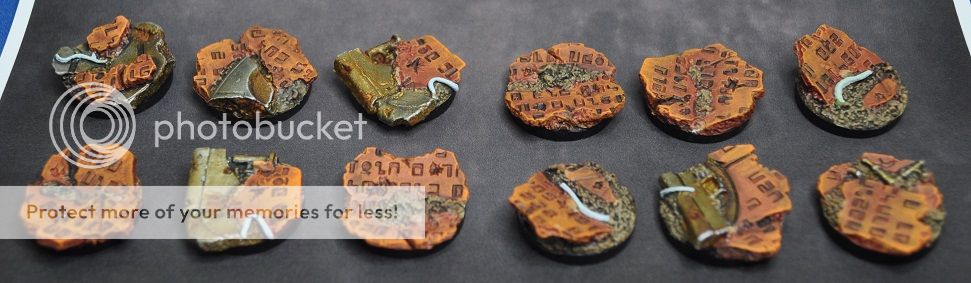
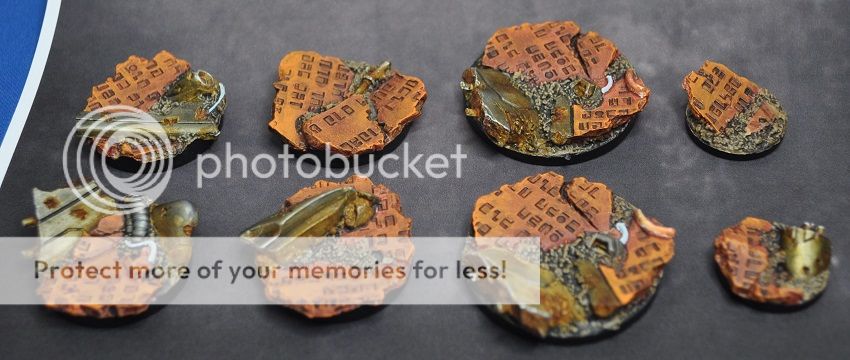
Here's what the basing materials and early stages look like. Cork and slate are superglued in place first and usually a tactical position to cover basing holes, or create resting points for feet and weaponry. Then liberal application of PVA across the rest of the base, a sprinkle of the heavy gravel, then the lighter gravel, tapping back out into the box each time so any loose material is saved for later, and finally the sand over everything.

The ballast fixer is great, but I can't stress enough how awful it smells. It's fine on one model, but when you're basing 80+ models at the same time, it's a powerful odour and I was happy to leave these out in the garden for a day to avoid the worst of the smell.


 Google have added a potentially interesting feature to Blogger, where it will auto-generate search links for useful terms. I tried it on my previous post, but the decision making, and therefore quality of links is poor. I don't think anyone wants to search for blue, for example, but the link to NMM is excellent. It could have utility in the future, just not yet for me.

Monday, 21 September 2020

Scratch built base

I did two bases for my Chaos Spawn project, and both were scratch built, and thought it would be fun to share the process.

Start with an idea of what you want to do before anything is glued down! Here, my thinking was a destroyed science facility. Interestingly, it was only after completing these that I realised I'd used a similar theme with similar monsters last year (https://nerodine.blogspot.com/2019/07/roman-lappat-beginner-course.html) and pretty confident I was subconsciously influenced by this.

Blue cylinders are pieces of plastic straw, with some old cables from discarded PC parts glued inside. After that, it's a combination of leftover items from my bits box. So there's pop-out pieces from MDF terrain kits, some cork tiles I ripped up, Necromunda belt kits, basing paste, little cut offs of balsa wood. Anything to add to the feeling of a building that's been utterly destroyed.

 When the larger items were firmly in position, I generously applied superglue over the empty areas, and sprinkled large gravel in, and then very fine gravel to fill the inbetween spaces.

 The last step was ensuring it was all properly dried, then applying a dilution of PVA and water over everything to lock it in position. Leave for a few hours, then it's rock hard and you won't risk the gravel falling off.

There are large, flat surfaces here, despite the appearance. That's deliberate to ensure the monster feet have somewhere to securely place.I went back and forth checking it was still a good fit.

Black primer, then a harsh zenithal. I was pleased how coherent it looks at this point. There's something very pleasing to a well primed item.

Riffing on the colours used on my Chaos Spawn, I've tried not to focus on picking out elements of the base - rather just the feeling of a lot of rubble.

Highlights, such as they are, are just from the bluer end of the colours used on the Chaos Spawn. A little red and pink is added to the lettering to give an area of interest, but you won't see most of it when the monster's glued on top - so there isn't any point spending too long here.


Sunday, 14 April 2019

Painting Neon Bases - The First Element

Usually a work in progress is exactly that, but I realised my current WIP merited something more, and suddenly here's a tutorial for creating outrageous colours on bases. This is the Triple Hex pattern from Green Stuff World and I adore it.

Rolled out a base back in November 2018 as a test piece and then promptly put it to the side without really having a plan. Then my brain knew exactly what it wanted to do, and so here we are.


I like this effect, but as a painter of middling ability, I prefer deeper recesses to help me avoid painting over the wrong area. However ... off we go. Basecoated with the ever-reliable Hexed Lichen


Alternating rows painted in Warlock Purple with Squid Pink highlights. It still felt a little flat, so I went back into the recesses with Hexed Lichen and a little Stormy Blue into the recesses. I added white dots along one edge of the pink shapes to give it a little depth.


The idea was to give the road surface a feeling of life. Perhaps the pink strips represent active panels, and the purple ones are currently inactive. Or it reflects the direction of traffic flow. Who knows? Here's the rough plan with the vehicle adding to the big colours. You may have an idea of what I'm aiming for at this point with the inclusion of these two Heresy miniatures, but maybe not ...


The base still felt like it needed something more. Electric Blue really is quite electric. My eyes are starting to hurt a little while looking at this now, and strangely ... I'm okay with that. It reminded me of an oldschool computer game where the lives left are outlined in a super bright colours, or perhaps Moebius' concepts on Tron. Who knows.


This still wasn't sufficient, because I'm a masochist, so it's back into the recesses to add Dead White into my Electric Blue and paint in just two edges with this brighter colour. Again, trying to create the feeling of more depth in the shape. I also returned to the darker hexes and used Hexed Lichen and Warlock Purple and edged them, then added a little Dead White to that mix as final dots.


I'd done a little more work on the vehicle in the meantime, so here they are in situ. Reflecting the sames blues in the windows of the car and a little of that purple and blue "bouncing" up onto the underside of the yellow, with the blue exaggerated for effect.


So there you have it. A guide to painting face melting colours. I wouldn't recommend it for basing a whole army, unless you have an excellent therapist.

Saturday, 1 July 2017

Homebrew Objective Markers

Dusting off the 40k boxes and found old objective markers I made from scratch and thought I'd share. Not fancy, but effective on the table.


The former is empty paintpots, and the latter is MDF offcuts from an old project, and some sort of plug that was lying around.

Monday, 26 June 2017

Space Wolves: Fenrisian Wolves pt.1

Another day, another wolf - and this is the first from my test batch of new bases for my Space Wolves in 8th edition.


Seeing the greys against the base is a big moment. I'm delighted that the colour choices have worked out here! Especially as I'm now 62 bases into the project and hadn't done a test run. With hindsight, trying a single base and a model first would probably have been the smarter idea ... right?

Thursday, 22 June 2017

Warhammer 40k: Sector Imperialis bases

Prepping for the new, and rather excellent looking Primaris Space Marines, I've started building out a new basing scheme and finished the first set of 58x 32mm bases! Phew.


If you're interested in repeating the scheme:

  • Basecoated with Gunmetal Metal, Brassy Brass, Beasty Brown and Martian Earth on the four main areas
  • Metals shaded with Army Painter Dark Wash
  • Brassy Brass then corroded with Nihilakh Oxide
  • Drybrushing Orange Fire over Martian Earth, and Plague Brown over Beasty Brown
  • Higlights picked out with Chainmail Silver over Gunmetal Metal and Bright Bronze over Brassy Brass
If you were wondering where the missing two bases from the set of 60 have gone, they were prototypes for refining the scheme and you can find them on my Inquisitor and Daemonhunter.

Just another 20x 40mm, 40x 25mm and a few 50mm and 60mm bases and ... well, anyway ... there's few to do before it's all done. Why so many? I'm keen to get them finished up while the scheme's familiar to me - and frankly it's too warm to do detailed work on individual figures.

Monday, 9 November 2015

Guild Ball, Infernal Golem and bases

I've finally decided Siren's finished.


But ... am I happy with it? No. I realised if it isn't at least painted up and on the table, it could be an eternity before it makes it there. Face still bugging me, and after looking back - the browns are far too similar and run into each other. Upside? Hair better than it was, and after taking advice I went back to a light brown then worked up - sadly it's a little too far into white for blonde now and gone full Rogue (movie version) but that's alright - chalk it up to happy accident.

Sash around the waist was a pleasant success for my first attempt at wet blending in quite some time. However, she'll still look ace on the table ... so on to the next one!

Well, almost. My attempt to procrastinate finishing off the rest of my Guild Ball Fishermen has been going well. This is a figure picked up at Salute this year and it practically fell onto the painting table. It's a brute of a piece and a manufacturer I wasn't aware of before the show. Behold the Infernal Golem.


All cleaned up, and boy there's a lot of pieces here. Needs to think about what to do with all this now, some dry fitting and planning required.

To pass the time, I've finished up a set of the CMON bases from a Kickstarter - love these!


They'll sit patiently on the side to be used when adding more civilians to the earlier Colony 87 set. Nice to get them wrapped while I remembered the colour choices from the last time.

Sunday, 9 August 2015

Colony 87: WIP #2

In the words of Granny Weatherwax ... I ATEN'T DED.

Being back in work after a little time off on paternity leave has been a killer of the brain and free time, but nearly back to normality - or thereabouts. I've started to try and improve blending and layering on figures and another of the Colony 87 figures was just perfect to work on - Lord Greiss' cloak.


Now I have a problem! He's wearing a sash and I'm stuck on what colour to paint it. Happy with my other colour choices - military grey outfit and ostentatious green and gold cloak but what colour should the sash be? While quite a minor item, it's noticable because it's right in the middle of the figure.


I had planned to make the jewel settings gold and the jewels red, and wasn't sure if the sash should use one of the existing colours (green or red?) or be another colour. I'll be trying out a cream and see how that goes - think it will fit well against the cooler greys and reds of the gems.

A little more progress made since these original shots, Lord's cloak, gems and metalwork are finished up and his consort, the mysterious Lady Greiss has a cloak in her Lord's colours and a fur collar.


These have been unusual figures for me to-date as I've painted individual elements to completion, rather than my usual plan of all the basecoats and then back to the shading & highlights. Apart from a solitary, accidental touch of gold from the belt buckle onto the jacket piping on the Lord, I've been considerably neater than normal which was surprising! Maybe there's something in this approach after all ... it does feel like I have to concentrate a little more and yields a better result.

As the brain's not up to too much complex painting at the moment, my background job this week was to start painting up the other bases in this set, along with all the resin inserts and balls for Guild Ball ...


Anyone telling you that I don't know how to live a rock'n'roll lifestyle is clearly fibbing.

Thursday, 23 July 2015

Colony 87: WIP #1

So, I've temporarily paused work on Guild Ball as the active project to allow myself to be sidelined by the Colony 87 figures. Too excited by them to put on hold until existing projects are completed and let the enthusiasm wane.

Preparation work all done so they're primed and based with the CMON bases, and choices were adjusted with to allow better positioning of the feet. It's possible to cut out some of the basedetail to anchor them in place as it's only resin, but I wanted to try and find a natural position for them - and did! Very pleasing.


Each figure has been pinned through both feet, as I wanted to keep them well anchored - they're heavy and I wasn't confident superglue alone would retain them. Only minor damage to two feet and once painted you won't know who it happened to. Promise.

For basing, the original colours from the Kickstarter were as follows: The picture is very helpful as a reference piece to determine what's rubble, wreckage and stone work - as my eye for detail on fine casting is shocking. As these pieces won't be going into 40k, I have a little more freedom to pick out different colours and plan to do more metallics than the comedy Tau colouring on everything.

To recap on the excellent Colony 87 figures. They essentially come in two pairs: Pash Grolin and Kay Dee, then Lord-Governor Manduc Greiss and Lady Greiss & Creaster. Then one not-pair of Barcoon Krobosh and Wandering Alexei. At the time of writing, I've only seen painted versions of Lady (link) & Lord (link), Pash (link) and Barcoon (link). No love for Kay or Alexei yet so ... work has started on Kay and Pash to rectify this. Think I may give Pash a metal walking stick instead of a wooden one and just having the carry cases on Kay as silver feels a little boring - but getting an idea of what they look like now.


But then with a little burst of enthusiasm, suddenly I have them finished ...


I've tried to use the red jackets with white piping to tie them together, but then dampen the colour choices on Kay to represent him working for Pash. Conversely, Pash as a the man of trade deserved something a little more flamboyant, so I've used yellow for his robes - this is a lot bolder and brighter than the dirtier yellow on my Genestealers and both of them are clean and well presented. The only things in poor condition are the trading boxes being carried by Kay.

And a shot of the bases to show the detail a little better, albeit a wee bit blurry. Terracotta base, mix of terracotta and orange over that, shaded in to the alien lettering then some detail picked out in orange - and we're done!


Can't remember the last time I sat down to start painting a figure and a) felt compelled to try and get it finished in its entirely and b) had the time to achieve this. Very pleased with myself. *purrs quietly*

Tuesday, 14 July 2015

CMON Base System

A wise man once said "Kickstarter projects, they're like getting a little present from Past You to Future You" and in the last couple of weeks, Past Me has been a very generous soul and bought Future Me a few excellent things.

CMON produced a range of resin bases with Micro Art Studios and if you've ever wondered what 272 resin bases bagged up looks like, then wonder no more!


(You also receive the bases they fit into, but those are standard and boring so not included in the shot)

Quality is great, and I'm very happy with them. Estimated delivery date of February '15 was missed by a good four months, but if you go into a CMON Kickstarter with the understanding that they're flat out lying on delivery dates then you won't be disappointed with the actual goods when they arrive.

Each style came as 2x 50mm, 12x 40mm and 20x 30mm which is a handsome set and enough to base an entire skirmish warband in some games. Cost of these? Including shipping to the UK, they averaged at 40 pence per base - making no concession to the different sizes. That equates to £13.60 a set and feels good value, especially when a glance over retailers indicates I could get the equivalent Tau set for £41.36 on "discount" - which would be too rich for my blood.

If I work out how to use this lot up in the coming months, then I'd happily back a second wave to get more. Well done Past Me, you did a good thing.