Thursday 23 July 2015

Colony 87: WIP #1

So, I've temporarily paused work on Guild Ball as the active project to allow myself to be sidelined by the Colony 87 figures. Too excited by them to put on hold until existing projects are completed and let the enthusiasm wane.

Preparation work all done so they're primed and based with the CMON bases, and choices were adjusted with to allow better positioning of the feet. It's possible to cut out some of the basedetail to anchor them in place as it's only resin, but I wanted to try and find a natural position for them - and did! Very pleasing.


Each figure has been pinned through both feet, as I wanted to keep them well anchored - they're heavy and I wasn't confident superglue alone would retain them. Only minor damage to two feet and once painted you won't know who it happened to. Promise.

For basing, the original colours from the Kickstarter were as follows: 
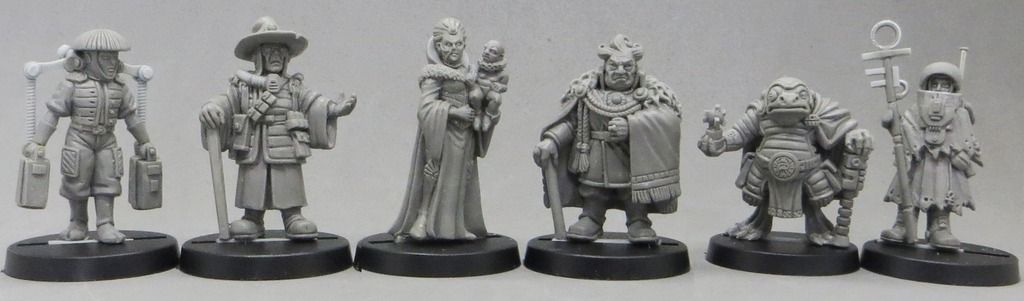
The picture is very helpful as a reference piece to determine what's rubble, wreckage and stone work - as my eye for detail on fine casting is shocking. As these pieces won't be going into 40k, I have a little more freedom to pick out different colours and plan to do more metallics than the comedy Tau colouring on everything.

To recap on the excellent Colony 87 figures. They essentially come in two pairs: Pash Grolin and Kay Dee, then Lord-Governor Manduc Greiss and Lady Greiss & Creaster. Then one not-pair of Barcoon Krobosh and Wandering Alexei. At the time of writing, I've only seen painted versions of Lady (link) & Lord (link), Pash (link) and Barcoon (link). No love for Kay or Alexei yet so ... work has started on Kay and Pash to rectify this. Think I may give Pash a metal walking stick instead of a wooden one and just having the carry cases on Kay as silver feels a little boring - but getting an idea of what they look like now.


But then with a little burst of enthusiasm, suddenly I have them finished ...


I've tried to use the red jackets with white piping to tie them together, but then dampen the colour choices on Kay to represent him working for Pash. Conversely, Pash as a the man of trade deserved something a little more flamboyant, so I've used yellow for his robes - this is a lot bolder and brighter than the dirtier yellow on my Genestealers and both of them are clean and well presented. The only things in poor condition are the trading boxes being carried by Kay.

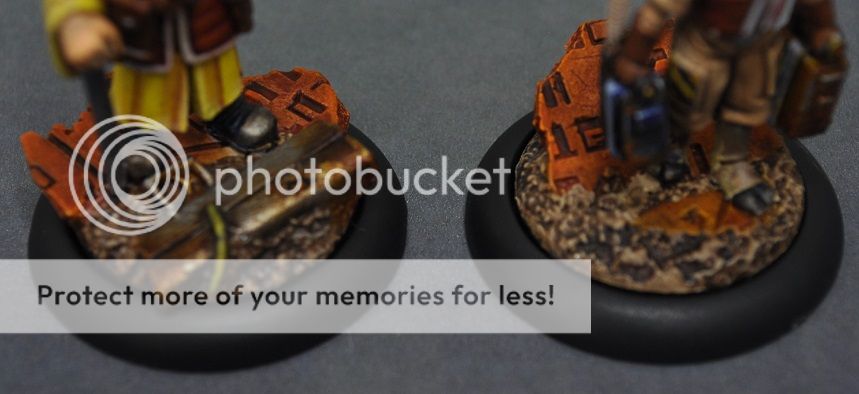
And a shot of the bases to show the detail a little better, albeit a wee bit blurry. Terracotta base, mix of terracotta and orange over that, shaded in to the alien lettering then some detail picked out in orange - and we're done!


Can't remember the last time I sat down to start painting a figure and a) felt compelled to try and get it finished in its entirely and b) had the time to achieve this. Very pleased with myself. *purrs quietly*

Monday 20 July 2015

Colony 87: Introduction

My favourite thing at the moment is the arrival of Jon Boyce's new Colony 87 figures from another Kickstarter. They hark back to the Rogue Trader mindset of sci-fi, where not everything and everyone needed to be shooting someone, or grotesquely muscled, and really captures the futuristic civilian feel.

(images nicked from the Kickstarter and joined in sequence, as his photos are better quality)

From left to right, they are Kay Dee, Pash Grolin, Lady Greiss and Creaster, Lord-Governor Manduc Greiss, Barcoon Krobosh and Wandering Alexei. Look on the Kickstarter for a little more detail.

Worth noting that it was funded mid-May, and delivered end of June/early July - basically on schedule. Kickstarters are notorious for being delayed, so it's very pleasing to see smaller operations like this do well, and I look forward to backing more of them in time.

I've paired mine with some of the Tau Ceti bases from the CMON Kickstarter mentioned previously, and longer-term would like to build a fuller group of non-combatants. Maybe as NPCs for our soon-to-start RPG adventure in Star Wars: Edge of the Empire. Perhaps they indicate a crashed starliner that was carrying people between planets and we find the survivors making the most of things on a new environment, or whether it's a planned, established settlement. I haven't decided what my approach to Colony 87 is. 


Hopefully a second wave of Jon's figures will be forthcoming later this year, as he has stated preparations are already underway. I certainly hope it comes to fruition because the quality of production and sculpt is excellent. Feel free to throw money at him, as the team he assembled to make this happen is clearly a bunch of talented souls.

With my hat of optimism on, I think it's a wonderful problem to have so many beautiful models to paint, and only being limited by the free time available to me.

Tuesday 14 July 2015

CMON Base System

A wise man once said "Kickstarter projects, they're like getting a little present from Past You to Future You" and in the last couple of weeks, Past Me has been a very generous soul and bought Future Me a few excellent things.

CMON produced a range of resin bases with Micro Art Studios and if you've ever wondered what 272 resin bases bagged up looks like, then wonder no more!


(You also receive the bases they fit into, but those are standard and boring so not included in the shot)

Quality is great, and I'm very happy with them. Estimated delivery date of February '15 was missed by a good four months, but if you go into a CMON Kickstarter with the understanding that they're flat out lying on delivery dates then you won't be disappointed with the actual goods when they arrive.

Each style came as 2x 50mm, 12x 40mm and 20x 30mm which is a handsome set and enough to base an entire skirmish warband in some games. Cost of these? Including shipping to the UK, they averaged at 40 pence per base - making no concession to the different sizes. That equates to £13.60 a set and feels good value, especially when a glance over retailers indicates I could get the equivalent Tau set for £41.36 on "discount" - which would be too rich for my blood.

If I work out how to use this lot up in the coming months, then I'd happily back a second wave to get more. Well done Past Me, you did a good thing.

Monday 13 July 2015

Zombicide: Abominations

Had an offline request to run through a process of quickly painting tabletop quality characters, so I adapted my plan to paint up the two Abominations properly and now we're trying to see how fast they could be wrapped up. More importantly, with one eye on my recent Kickstarter backing of Zombicide: Black Plague ... I've had the realisation there's a lot of figures coming my way 2016 (no-one believes CMON's 2015 delivery date) and I'll go round the bend trying to paint them all in the traditional fashion.

This means corners need to be cut. It's time to try out Army Painter dip! I bought a jar of this a few years back with the express purpose of doing a Skaven Warhammer Fantasy army, but that idea never got off the ground, and the tin hasn't been given a thorough workout. One thing putting me off the idea was the literal dipping of the figure, but turns out modern wisdom recommends painting it on. After a few YouTubetorials on the subject, basically I'm now an expert on the whole thing (right?) ... so off we go.


Figures basecoated. Common colours kept for skin, bones beginning to poke through the skin and toolkit around the belt, then different colour clothing for a little variety. Exactly how I normally paint so far. Watching people raise one area of the figure to perfection before moving to the next is an anathema to me.


Army Painter Strong Tone applied in liberal amounts. At this point, this looks bad. BAD. You also have to move quickly to ensure it doesn't pool up as it slides down the figure.


24 hours pass, and the varnish has dried. I'm unimpressed at this point, they look a mess.


But then, something strange happens. Matte varnish changes everything. The calming effect it has not only on the shine but also the colour, is quite interesting. We're no longer looking at near black delineation, it's more a nut brown colour in the recesses and a little more natural. Or as natural as painting plastic zombies with woodstain can be.


Few quick touch ups, some blood and goggles added, then a quick touch up of the skin colour where areas pooled ... and hey presto! Tabletop quality figures? I think so. Long way from "great" but certainly "it'll do" which is just dandy on the playing surface.


Better quality shots with a camera ...


Things learned here ...

  • Few years back, I'd probably have called this cheating. Now? Not sure. This isn't a painting technique designed to replace proper painting, but it is a technique designed to get figures onto the tabletop, and quickly.
  • If you don't watch the application of this stuff, it'll pool and become sticky very quickly, making a real hash of the figure.
  • There was far more detail on these figures than I expected, and my attention to detail is poor. Evidenced by missing the goggles entirely on the basecoating phase of painting.
  • If basecoating en masse, I'd use a colour primer to speed up the process. For two figures, painting the skin by hand was no hardship.
  • Did I mention quick? Around two hours of actual time spent over a 25 hour period. This was an hour per figure, being generous.
  • You could probably use this as a base for deep shading and then picking out detail by painting up normally for highlights. I may try this in the future.

Taa-daa. Thoughts on this?

Bit of painting downtime for a week or so as we do final prep and hunkering down before our son arrives. Little bugger is now a week overdue, so he'll be joining us soon enough. Once I'm back into the swing, it's Siren for my Fisherman's Guild team to crack on with. Good times ahead!

Saturday 11 July 2015

Build Your Own Dice Tray

Brief detour from the usual painting.

As a keen tabletop gamer, dice rolling features heavily in my current hobby activities. After a while, it gets a little tiring having dice scatter over the table - so a tray to roll them safely in is a requirement. I spotted this article on the excellent Ikea Hacker blog last month, and knew I had to build my own - and deviated only slightly from the original.

Buy the following:

  • IKEA Ribba photo frame. The 9" x 9" frame should be sufficient, unless you play to roll dozens of dice every round.
  • Felt. I bought non-adhesive and just had rolls of double-sided sticky tape, but you can buy self-adhesive felt too - but that's a little more expensive
  • Sticky tape. Only required if you buy the boring felt.

Total cost for the above? £4.50, which is £3.50 for the frame, £1.00 for the felt and tape.

Open up the frame, and remove all the inserts.

Apply the sticky tape to the four edges on one side of the glass, then line up the felt and stick it on. Why use the glass? No chance of accidentally denting it if I drop anything on it, and when the felt inevitably wears out, I'll flip the glass over and do the same on the other side.

Reinsert the inner square, so all the flat pieces will end up at the back now. Now add the glass with the felt, then the other pieces and finally the back panel.

You're done. Five minutes of your time to create a great dice tray. I'll guarantee it's harder to get out of Ikea than it is to build this. Enjoy!

Wednesday 8 July 2015

Zombicide: Abominations & Scenery (WIP)

As a brief interlude from painting the Fisherman's Guild, I've started work on a few Zombicide pieces for a friend. Thankfully not the whole box of them ...

He bought a fully painted Zombicide Season 1 set, but it came with two Abominations unpainted, so I offered to complete them as we're both a wee bit obsessive about things left unfinished, and this will scratch that itch.

In addition to the Abominations, the Zombicide Season 3 set came with a couple of very nice 3D barricade pieces to replace the 2D tokens usually in place on the board. From a gaming perspective, I'm a fan of this approach and they're doing more of it on the new Zombicide: Black Plague set. Touch of the Heroquest about having doors and room objects scattered through your encounters.


(how they started life, as reference)

Quite literally a quick paintjob, with maybe 2-3 hours for the pair at a guess. There are a few noob errors, but they'll remain as is as they're back with their owner for packing and transport while he moves home. You may be spotting that I'm loving the rust-in-a-bottle!

Curiously, I couldn't find painted versions of these online as reference material - odd considering how many people play Zombicide, and would have gotten these in their Season 3 box.

So for the hard of SEO, there you go - painted Zombicide barricades from the 3D plastic door pack.

Monday 6 July 2015

Guild Ball Fishermen: WIP #3

More painting has happened, and now I find myself with a pair of Kraken models completed. Is the plural of Kraken still Kraken? Anyway, there's definitely two of them - and now they're finished.


One is a little more worn and rusted than the other, as I love my rust effect in a bottle and felt obliged to use it on at least one Kraken. My attempts to do skintones still need improvement, as what feels like a super smooth transition is exposed for the lie it is when you take photos at this distance. That's okay, I won't beat myself up over it - just try and do a little better on the next one. Happy with how the Experimental Pants (tm) worked out, and blue glazes on the leather and metals worked out better than I hoped, so there'll be more playing with glazing in the future. It's subtlety beyond my understanding, but I'll continue to try them out.

Saturday 4 July 2015

Guild Ball Fishermen: WIP #2

A month has passed, and work has been all consuming. But happily progress has happened.

Having examined the team, the trickiest part present on all the figures is the rope; it's wrapped around roles, hanging out of clothes and generally used well to establish the nautical theme across all the models. It's also proper fiddly (technical term).


Kraken underway. Part of me is now regretting not upgrading to resin figures for the weight reduction alone, as this fellow is a serious chunk of metal. Primer had a 'mare in places (by "primer" I mean "me") but painting the basecoat of Bronzed Flesh seemed to level that out just fine. He does have an arm, but it will remain detached for a while longer.


Salt finished. Can't quite get a shot with the little fellow in full focus. Khaki base, some wet blending of White on his adorable little tummy, more Khaki and a thin brush to pull out some individual hairs. I didn't go with the white and grey dapple that the character card offered, and painted without bothering to look at a picture of a real otter, but it's a reasonable match - apart from the nose being a little too red rather than brown. His collar is in team colours, so at least something was right!


Ball finished. I'm oddly proud of this, as normally my attention span goes to pot for detail of this nature, but it turned out alright. Based with Beasty Brown, panels painted in Khaki then lots of thin Parasite Brown washes on the panels. And yes, I have chickened out in painting white lines to this point - but I'm waiting for my official game mats to arrive and gauge the line thickness before adding.