Monday 24 August 2015

Colony 87: WIP #3

And lo, risen from the flu-ridden grave I found myself in last week - I finally finished up the Lord & Lady Greiss.


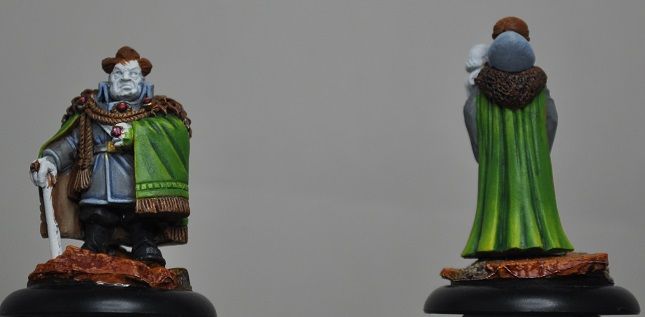
Lord's sash ended up cream, and it works very nicely across the middle against the barrage of colours elsewhere. Sits well with the quieter martial uniform, and against the gaudy jewellery and ostentatious robes he's given himself. I wanted the Lady and her child to look a little otherworldly so they got a touch of the Fremen which unintentionally ties nicely to the robes.

Next on the painting table? Finishing up the last two of the Colony 87 set with Barcoon Krobosh and Wandering Alexi have a little early painting action.


Let's take a moment to talk about poor Alexei. Having made the journey from manufacturer to me without his very fragile staff breaking, he suffered an accident during the pinning process and is now missing the top half of the staff. Oh the shame. Then I realised it actually fits quite nicely with almost all the other characters having a stick of comparable length - so haven't (yet) made an attempt to stick it back on.

Wasn't sure I'd get anything finished this month, so to get two figures wrapped to my satisfaction was very pleasing. Here's hoping September sees an upturn in output - but even at this stage I think it's now my most productive painting year ever and that's down to the One Mini A Month challenge spurring me on. Hooray!

Sunday 23 August 2015

Building a Wet Palette

I came to the idea of a wet palette this year on my return to gaming, and have found it invaluable for day-to-day painting. As a friend is starting into painting, and itt seems no two palettes are ever quite the same, here's my interpretation for his benefit.

Here's the components, and below is the explanation of key ingredients to make the palette:


Plastic tupperware container with a matching lid. Important, as when you seal it back up, the moisture now trapped inside cankeep your paints workable for a week or more.
  • Sponge. This is a simple car sponge from Halfords that I cut into upper and lower halves. My irregular cutting is then hidden because you want the smooth surface uppermost.
  • Kitchen towel. Highly absorbent and offers the baking parchment better support than just the sponge.
  • Baking parchment. Cut to size - ideally a little smaller than the container size. The one in my illustration is a little too big.
  • Sainsbury's strawberry & vanilla ice cream cone. Probably THE critical item in the build. You'll know when the moment arrives.
Late addition to the article. As good practice, and I was reminded by the first poster on this article (thanks Brambleten) you should look to replace the kitchen towel and tower on a weekly basis. It can fur up with mold, and you want to keep this clean with fresh supplies to ensure it has the best lifespan possible.

Onto the compilation of the elements ...

  • Fill the container with water to almost the brim, put the sponge in and soak up as much water as possible. Once the sponge is at capacity, I tip away some of the excess so around the corners it's only up to the top surface of the sponge.
  • Put the sheet of kitchen towel over the top and watch that absorb some of the excess. Tuck in the corners for neatness.
  • Place the baking parchment on top. This will be a barrier to the water below, but will benefit from the moisture and keep the paints.


That's it. Wet palette made.

I can't disclose at what stage the ice cream was eaten. This is only something you'll be able to determine from a couple of dry runs of your own.

Sunday 9 August 2015

Colony 87: WIP #2

In the words of Granny Weatherwax ... I ATEN'T DED.

Being back in work after a little time off on paternity leave has been a killer of the brain and free time, but nearly back to normality - or thereabouts. I've started to try and improve blending and layering on figures and another of the Colony 87 figures was just perfect to work on - Lord Greiss' cloak.


Now I have a problem! He's wearing a sash and I'm stuck on what colour to paint it. Happy with my other colour choices - military grey outfit and ostentatious green and gold cloak but what colour should the sash be? While quite a minor item, it's noticable because it's right in the middle of the figure.


I had planned to make the jewel settings gold and the jewels red, and wasn't sure if the sash should use one of the existing colours (green or red?) or be another colour. I'll be trying out a cream and see how that goes - think it will fit well against the cooler greys and reds of the gems.

A little more progress made since these original shots, Lord's cloak, gems and metalwork are finished up and his consort, the mysterious Lady Greiss has a cloak in her Lord's colours and a fur collar.


These have been unusual figures for me to-date as I've painted individual elements to completion, rather than my usual plan of all the basecoats and then back to the shading & highlights. Apart from a solitary, accidental touch of gold from the belt buckle onto the jacket piping on the Lord, I've been considerably neater than normal which was surprising! Maybe there's something in this approach after all ... it does feel like I have to concentrate a little more and yields a better result.

As the brain's not up to too much complex painting at the moment, my background job this week was to start painting up the other bases in this set, along with all the resin inserts and balls for Guild Ball ...


Anyone telling you that I don't know how to live a rock'n'roll lifestyle is clearly fibbing.