Thursday 31 December 2015

Infernal Golem of Kashan Vra

This is cutting is close to the wire, but my final finished figure of 2015 is here! For the life of me I couldn't get a decent photo*, but with time constraint today of getting it wrapped to meet my goal of at least one miniature completed every month ... it'll do.

* But in the words of the immortal Bucks Fizz, the camera never lies.


He's a beast of a figure, and ridiculously unbalanced weight wise, which has caused me a few problems. I've taken him off his base while I think about how to base to offset the front leaning pose that's causing the problem. Why no shots of the feet? He's stuck onto a Guy Garvey CD with blue tack in the best of makeshift "basing" :D


I've tried to make it look like the glow from his eyes is reflecting onto spots on the horns. I know it's crude not quite right, but it's a learning for the future ;)


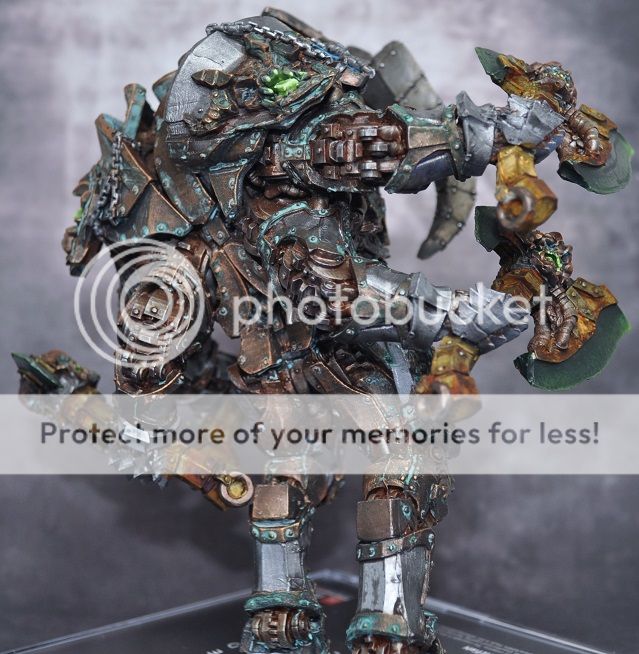
I had a bit more fun with the OSL and tried to have it reflect back off the axe heads onto the body of the figure where appropriate. I need a lot more practice of this technique, but it's good fun.


In hindsight, I think the sculpt's lovely but the kit itself is a little disappointing. The production method used has left odd striations on almost every surface - most noticable on the horns and axe blades - and almost no surface is perfectly smooth as I'd expect from a high-end resin kit. There's quite a bit I know can be improved but by yesterday I'd hit a wall of wanting it done and off the painting desk, but it took me far outside my 28mm figure comfort zone and encouraged me to try a few new techniques and that's no bad thing. More importantly, that concludes my first year back into painting after four years out of the hobby and I'm glad to be back.

Thursday 24 December 2015

Infernal Golem and painting glowing blades

So, I got ahead of the Christmas wrapping curve, and was able to make a little progress with the big man today. While I remain undecided on how to proceed with the blades, I did manage to reach a happy mid-point where it's not pure black, and does echo the greens of the embedded stones. I realised they put me in mind of warpstone from Warhammer Fantasy, so have proceeded to paint the blades as though they'd been fashioned with that same magic. A flying step-by-step for how I got the effect.

Basecoat the blade with Dark Green, then a dark brown wash into the recess

Drybrush with Goblin Green then Livery Green along the edges

Smooth down with a Dark Green glaze

Go bananas with the rust effect to see how it looks ...

Glue the damned thing together, even though it's not finished.

Still quite a bit to do, but it's nice to see the model taking shape and I'm happy with the progress! Alright, it won't be winning awards but I've had fun painting it :D Needs highlights adding back on the metals, but now I'm undecided whether to stick with the blades as is, or crack on with the original plan ... I may wuss out for the time being and leave it as is. Once finished and matt varnish is applied, they could benefit from gloss varnish being added to give an onyx-like feel.

As I've kept the OSL quite soft on the stones, despite their size, I'm not sure how much I'd apply from the blades back to the body, but will chew on it over the festive season. Also - now it's assembled I've realised that the weight of this figure is an issue. It's unbalanced and leaning forward heavily - which is how the sculpt requires it assembled, but now I need to counterbalance at the back to stop it tipping over.

Progress now paused for a few days, so Merry Christmas one and all!

Wednesday 23 December 2015

Infamy: Welcome to The Big Smoke - unboxing

While it's a slow month on the painting side so far, it's a great month for procrastination, sorting and filing miniatures and receiving Kickstarters. Chief among them has been the delivery of my Infamy Big Smoke order from the middle of last year. It took a while to arrive, and was a good six months past the originally anticipated date but was well worth the wait. I finally got the chance to sit down and catalog the pieces before assembling and priming ...


The detail on these figures is fantastic across the range, no matter the sculptor, and they've left me in the same wonderful and terrible position that Guild Ball did. I have a set of supremely detailed figures that I'll never do justice to paint-wise. It has given me an appreciation of the talent of folk painting them to such a high standard. I was impressed by Megazord Man's output before I had hands on the figures - but now I've seen the size of them, I don't even know how he can pick out that detail by eye - let alone paint it so beautifully.

Regarding Infamy themselves, they ran a great campaign, and had regular, informative updates for the backers and I'd consider backing subsequent campaigns. Well, once this mountain of resin is painted ...

Tuesday 22 December 2015

Infernal Golem and OSL

With a little mojo returning in the run up to Christmas, here's another update!

Good times.

Following a lovely little glowing eye guide by jah-joshua, to achieve that lovely object sourced lighting effect (OSL), I didn't have quite the same colours, so a spot of improvisation required ...


I've done the Golem's eyes and the warpstones powering him, and find myself very happy with how this effect has turned out.

But do you see the Xbox logo in there too?

I think my Golem's powered by Microsoft ...

There's green inside the upper jaw, as I'm doing the effect inside the mouth to show the glow coming from inside the creature's workings.

Looks a bit wafty right now, but will be fine once the lower jaw's attached.


In parallel, I've been working on the hands and weapons ...

Coupled with the verdigris around the eyes, it gives a little personality to the axe heads.

However ... as there's already so much metal, I was thinking that the axe blades could be stone. Thoughts?

Monday 21 December 2015

Infernal Golem progresses

Doesn't time fly. Some painting progress has been made, with only the metal plates remaining reasonably clean at this point. He's shaded and verdigrised to heck at this point, and had the good fortune of a head being added. The slightly 'off' join on the neck isn't an issue as there's a metal beard to be added which will make that go away.


It's possibly hard to tell compared to the last photo further up the thread - so here's a side by side comparison. Arms are in progress to the same stage but not added, because it all overlaps quite confusingly and makes detail work tricky for me.


The inner workings received a coat of AK Interactive Rust Streaks, then I pulled off the excess with cotton buds. Haven't used this before, but will be doing so again. You may cry "he's ruined it!" at this point, but actually I'm really happy with how its turning out - the colouring is a little more severe in the photo than real life, and pleasingly uneven. It looks like an unloved machine that hasn't been looked after - and may be a little pissed off by this.

Deciding on how or even whether to apply rust onto the exterior metal plates. I think I should, but any thoughts or comments for more experienced weathering wizards?

Last up, a recently backed Kickstarter project - the Basius series of molds to apply your greenstuff to for custom bases. It'll be a little while until they get a run out, but they look the business and the project was well run - even if the project page was laid out like a Geocities escapee :D


But they stack oh so neatly!