Wednesday, 8 July 2015

Zombicide: Abominations & Scenery (WIP)

As a brief interlude from painting the Fisherman's Guild, I've started work on a few Zombicide pieces for a friend. Thankfully not the whole box of them ...

He bought a fully painted Zombicide Season 1 set, but it came with two Abominations unpainted, so I offered to complete them as we're both a wee bit obsessive about things left unfinished, and this will scratch that itch.

In addition to the Abominations, the Zombicide Season 3 set came with a couple of very nice 3D barricade pieces to replace the 2D tokens usually in place on the board. From a gaming perspective, I'm a fan of this approach and they're doing more of it on the new Zombicide: Black Plague set. Touch of the Heroquest about having doors and room objects scattered through your encounters.


(how they started life, as reference)

Quite literally a quick paintjob, with maybe 2-3 hours for the pair at a guess. There are a few noob errors, but they'll remain as is as they're back with their owner for packing and transport while he moves home. You may be spotting that I'm loving the rust-in-a-bottle!

Curiously, I couldn't find painted versions of these online as reference material - odd considering how many people play Zombicide, and would have gotten these in their Season 3 box.

So for the hard of SEO, there you go - painted Zombicide barricades from the 3D plastic door pack.

Monday, 6 July 2015

Guild Ball Fishermen: WIP #3

More painting has happened, and now I find myself with a pair of Kraken models completed. Is the plural of Kraken still Kraken? Anyway, there's definitely two of them - and now they're finished.


One is a little more worn and rusted than the other, as I love my rust effect in a bottle and felt obliged to use it on at least one Kraken. My attempts to do skintones still need improvement, as what feels like a super smooth transition is exposed for the lie it is when you take photos at this distance. That's okay, I won't beat myself up over it - just try and do a little better on the next one. Happy with how the Experimental Pants (tm) worked out, and blue glazes on the leather and metals worked out better than I hoped, so there'll be more playing with glazing in the future. It's subtlety beyond my understanding, but I'll continue to try them out.

Saturday, 4 July 2015

Guild Ball Fishermen: WIP #2

A month has passed, and work has been all consuming. But happily progress has happened.

Having examined the team, the trickiest part present on all the figures is the rope; it's wrapped around roles, hanging out of clothes and generally used well to establish the nautical theme across all the models. It's also proper fiddly (technical term).


Kraken underway. Part of me is now regretting not upgrading to resin figures for the weight reduction alone, as this fellow is a serious chunk of metal. Primer had a 'mare in places (by "primer" I mean "me") but painting the basecoat of Bronzed Flesh seemed to level that out just fine. He does have an arm, but it will remain detached for a while longer.


Salt finished. Can't quite get a shot with the little fellow in full focus. Khaki base, some wet blending of White on his adorable little tummy, more Khaki and a thin brush to pull out some individual hairs. I didn't go with the white and grey dapple that the character card offered, and painted without bothering to look at a picture of a real otter, but it's a reasonable match - apart from the nose being a little too red rather than brown. His collar is in team colours, so at least something was right!


Ball finished. I'm oddly proud of this, as normally my attention span goes to pot for detail of this nature, but it turned out alright. Based with Beasty Brown, panels painted in Khaki then lots of thin Parasite Brown washes on the panels. And yes, I have chickened out in painting white lines to this point - but I'm waiting for my official game mats to arrive and gauge the line thickness before adding.

Wednesday, 27 May 2015

Guild Ball: Fishermen (WIP #1)

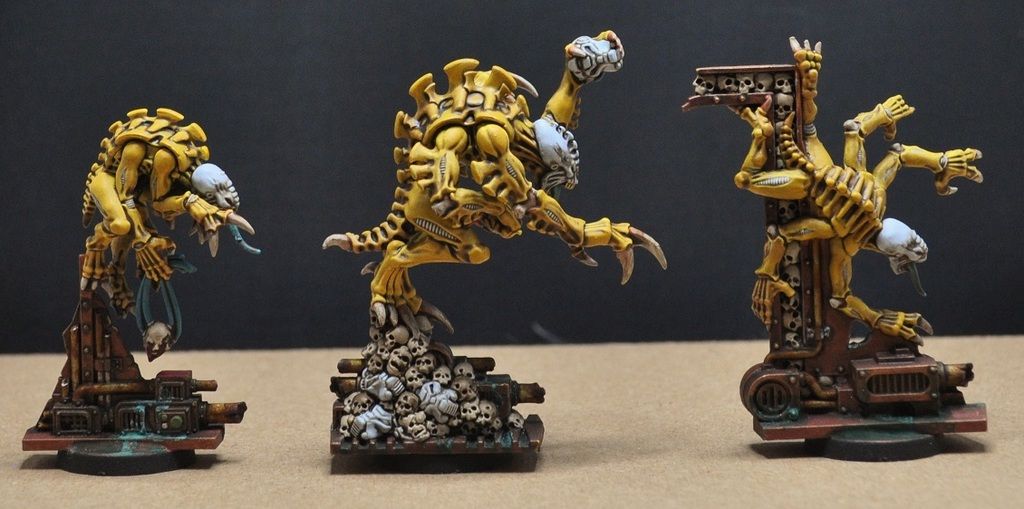
So, we had to start somewhere and Fishermen were requested as a favourite of two players. Anyone unfamiliar with the game, the Fishermen look like this ...


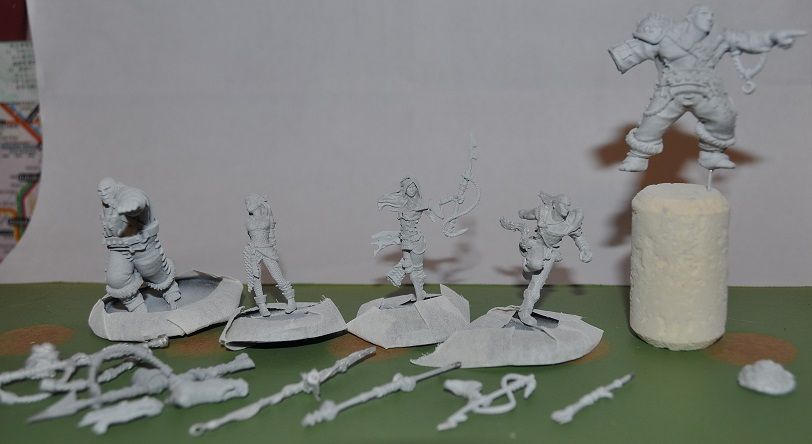
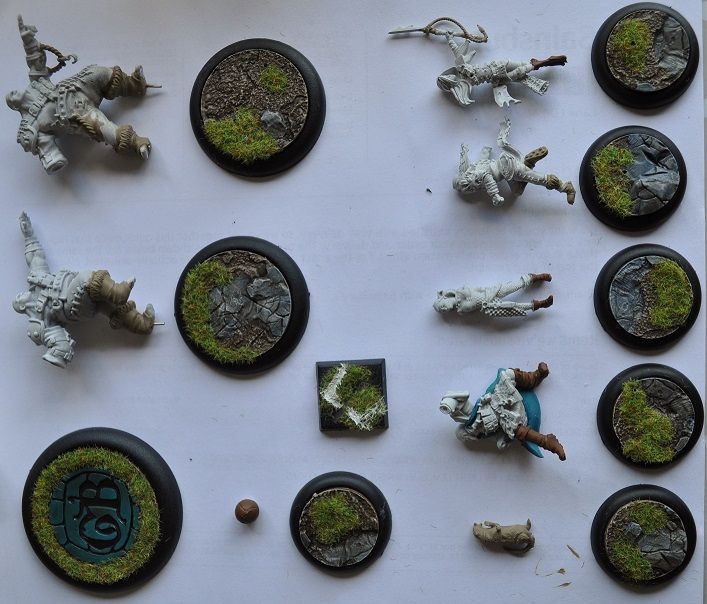
Left to right: Angel, Salt (otter), Kraken, Shark, Greyscales, Jac and Siren. They don't come pre-painted or fully assembled, so you have a bit of work to do before they're looking as handsome as that. So here's a shot of where mine are ...


They're now primed and the above shows Kraken (from Salute), Salt (comatose and out of focus), Angel, Siren, Shark and original Kraken. I don't own Jac, so he's missing. Greyscales' leg is only freshly pinned and glued so he's not in the picture, and Salt's tail ... well, currently he's going to be built without it as punishment for being a total dick, frankly. There is a level of finesse to handling some of these components which isn't compatible with my lack of dexterity.

These sculpts are so fine, and have so much detail it's a little intimidating. I bought corks to temporarily pin and base all the figures while painting, but some models are that slim on the ankles that it would be a terrible trial to attempt this, and only original Kraken required it in the end. I won't do final assembly until as near to the end as possible to give me a fighting chance of getting a paintbrush in to some of the details.

Next step, working out the colours to use took a little while so to keep things moving, I painted up the bases and will get the figures mounted on them sooner than originally planned.

Bases
The base inserts came from the Kickstarter campaign, and while I don't plan to use them for all the teams, they offer a quick way to base up the first team on the (slow, erratic) production line. Where paints are referenced, they're almost always Vallejo and either Game Color or Game Air unless explicitly stated otherwise. Base colours were Earth, drybrushed with 50/50 Earth and Khaki, drybrush of Khaki, drybrush of white, repeat on the stone with Sombre Grey and Stonewall Grey, then everything washed with Army Builder Soft Ink to dampen down the chalky highlights.

The goal is painted in the primary colour I'd like to use for the clothes of the Fishermen - a 4:1 ratio of Scurf Green to Imperial Blue.

Some static grass applied with Gorilla glue, then that's us done for the moment. I'll probably add white lines added to remind you it's for a football pitch, mulling whether I could slip in a water effect on the base to tie them to the Fishermen theme just a little more.

Salt now has his tail attached, as I calmed down sufficiently to jerry-rig a harness to have it told the tail in position long enough to set. I took the plunge and drilled pinning holes on all figures, and unfortunately damaged Siren's right foot (boo!) when doing this, but once in position it won't be noticable. Everything else survived unscathed which feels like a minor victory! Then, a very quick undercoat on the parts that will be touching the base as I need to secure them to the bases to manipulate them better.

There's a test square base with two ways to paint white lines. One with paint thinned as normal (top left), and the other with paint straight out the pot (bottom right). Can't decide which I prefer - but possibly edging toward the unthinned paint as it's a little uneven, and that feels more in keeping.

Monday, 25 May 2015

Guild Ball: Introduction

Having backed Guild Ball during its Kickstarter inception last year, it was very exciting to see the game realised and figures turn up in a box this April. In all the excitement I ordered the full eight teams, but not all the available figures, and realised it would be quite a task to get everything painted.

If you haven't played or aren't aware of it, it's a tactical skirmish game as a football/rugby hybrid with points awarded for scoring goals or taking out the opposition. Or if it's easier, call it Leeds United :) Quick to get to grips with, but suspect we'll spend years understanding the mechanics. Our gaming group is loving the skirmish format and how it can suddenly shift from a swift, tactical battle of wills to something more attritional with just one or two kicks of the ball.

Your starting lineup is comprised of a Captain, a Mascot then other players. No points values, it's down to your style and potentially who your opponents are. While I may occasionally post up a game report, the initial focus on my blog is to go through the painting process so first up, a shot of all the teams ...


Teams top left to bottom right: Black - Morticians, bright Red - Butchers, Purple - Union, Blue - Masons, dark Red - Engineers, Green - Alchemists, Cyan - Fishermen, Yellow - Brewers.  Union can draft certain players into the other teams, or be played on their own as the eighth team.

The team behind the game have released a couple of limited edition models outside of the standard rosters - an alternative Boiler, (available from shows during 2014), Kraken (shows during 2015) and Minx (Ax Faction cross-collaboration). In addtion, if you were on the Kickstarter then several of the sculpts are exclusive to that - mostly the team Captains. The only one missing from my collection currently is Minx - but that's fine.

To make the teams more portable, I've reboxed everything in extra deep business card cases thusly ...


Not sure if these will be sufficient in size once all teams are fully assembled, but we shall see.

As I occasionally play Magic, and have kids, keeping cards in good condition is paramount and it was pleasing to discover the player cards are only about 1mm wider than Magic cards! So all the character cards were double sleeved with KMC Perfect Size sleeves from top down then into KMC Hyper MAT Clear sleeves bottom up. Extra sleeving makes them less bendable and doesn't compromise the visibility of rules or detail on the cards, so they should remain in excellent condition for quite some time.

I'll start to paint up a couple of the teams in the coming weeks, as playing with painted miniatures is more fun than unpainted figures or paper proxies. There will be WIP posts too, rather than just finished teams.

Monday, 18 May 2015

Space Hulk: Genestealers

It took a while, but I've finally finished up all the Space Hulk Genestealers and here they are ...


My test model from a few weeks back is in the first shot, three along. The blue for squishy bits and retaining a yellow head make him look unfinished compared to the others but I felt it was nice to keep him there as my reminder of how they started out. Can't recall if I mentioned it previously, but everything was glued to standard round bases to make manipulation of the figure easier, and most importantly add balance and an even surface to the bottom.

Have I mentioned how much fun the bases are? The sculpt is very satisfying to paint, as almost anything you do with them brings out another detail and makes you feel like a king among men. Between the sculpt, and the rust and verdigris special effects, they were a joy.


The Terminator pieces, scattered across bases and held in claws, are painted up as Space Wolves to match (very) WIP Terminators I started converting a few years back. Still a way out from being dusted off, but they'll be consistent when I finally get there. By accident, the Genestealer skull colouring is too similar to the helmets - I may look to revise one of these at a future point, but not for the moment.


Claws, claws, claws. There are something in the region of 400 claws of varying sizes across 22 figures. OH MY GOD, THE TEDIUM. Initial dreams for subtle layering on claws died a horrible death when I realised the magnitude of the task so they're just based in brown, couple of thin coats of bone white then washed.

The end result is very pleasing, but not sure that I would do an entire army in this colour scheme. I'm a messy painter and correcting errors with yellow isn't fun, and takes significantly longer than any other colour. However, it's a problem for another year day as all these fellows are going on the shelf until Space Hulk is next pulled out for the evening.

Final shot of my favourite three from the beautiful bunch.


Super happy with the way this set of figures turned out, but I also had a little sigh of relief at getting to the end. Next project starting shortly ...

Thursday, 14 May 2015

Space Hulk: Genestealers (WIP)

Not dead, merely swamped with work, and I'm hoping the light at the end of the tunnel isn't oncoming traffic.

Slow, steady progress being made on Hive Fleet Bob* and the mind numbing block painting is finished and I've started washing and adding base detail. Here's the first pre and post shots of one of the Genestealers.

* It's a holding name, but it's growing on me ... like a fungal infection.

More work to do as I still have highlights, carapace to brighten up a little, bone to work up from the base brown, skin glazes and touch ups to go, but we're moving in the right direction! There was a change of heart from the first test figure - with 22 of them sat in front of me, it was just too yellow and needed breaking up.

I've made the head the same colour as the sinew coming out through the skin to give the figure definition, and that helped considerably.

The original brighter blue I planned for the squishy bits didn't look right against the skin and has been repurposed for the tongue. Now I need to take a moment to talk about the base ...

I mentioned before about picking up a few of the Modelmates effects at Salute, read a few tutorials on YouTube and opted to throw them on the base and see what happened. We started around this point before I thought "oh hello, what's this?" as straight out the bottle it was achieving something in seconds that takes me a lot longer to achieve with normal acrylics and lots of thinned Sick Green then Hawk Turqoise.


From this point on, it went a little bananas as I liberally applied the green verdigris and the rust effect ...

The rust effect is so much science in a bottle, it's basically magic. I don't understand how it works - but it does and is wonderful, wonderful stuff and now I want to put it on everything.

Is it accurately applied to the correct locations? Heck no! That's fine by me, as the effect it generates pleases me greatly at the moment :)

Sunday, 26 April 2015

Salute 2015 review

I haven't been to a wargames show before, but Salute's been on my "to do" list for a few years - and yet life has repeatedly gotten in the way of being able to book. 2015 was when I could finally go along with a friend, and it was worth the wait.

Essentially it's a large hall with 150 trade stands, and a lot of demonstration games running throughout the day - visited by ~6000-8000 people in a 7 hour period. You're encouraged to participate and spend. That's the facts, but it would do the whole day a disservice with just that description, it was a lot of fun.

As grown men, our teen nerds and adult wallets were unleashed in combination and we spent a good five hours walking around, looking at games we'd never heard of, skim-reading rulesets and getting excited about figure ranges we'd never seen.

The haul for the day as follows:

  • Top row: Infernal Golem (Titan Forge), Nazi zombies (Studio Miniatures), Weathering effects (Modelmates)
  • Middle row: Infamy ton* (Infamy), Engineers' Guild (Guildball)
  • Bottom row: Dimitri, Ivan and Hell'ington standard bearer (Blight Wheel), Hired Hands and Salute 2015 Limited Edition (Black Scorpion), Dragon Huntress (JoeK)
* Mine was missing the deck of cards, which was the primary item of interest but I've mailed them to ask if it's still available. Sadly I consider this my own stupid fault for not checking there and then :( 

The single downside to the event was people with massive rucksacks and no understanding that it doubles the depth of where they're standing, or how frustrating it is to be behind two of them and unable to see anything. The conference equivalent of getting the basketball player in front of you at a concert. Everything else was pretty good, from queuing to go in, to every booth being filled with enthusiasts ...

... which leads nicely on to my highlights from visiting the booths.
  • Guildball. Backed this on Kickstarter and picked up the only team I missed at the time, Engineers, and chatted with the guys on stand for their original campaign - it's a great range of figures across all the teams and definitely worth a look. Considering all pledges were posted to backers and they had to prepare a stand for Salute in the same week, they were clearly shattered but still soldiering on. Impressive.
  • Titan Forge. I want all of their figures and ideally right now, please. Settled for a single large purchase of their Infernal Golem, but it was hard narrowing the choices down. I think the website's out of date compared to the range on display at the show, but worth a look. Their range of Chaos Dwarves is marvellous.
  • Black Scorpion. Small but broad range of quality sculpts. I grabbed the Hired Hands and limited edition sculpt for the day. Crisp figures.
  • Modelmates. They had some great looking weathering effects available, so I picked up some rust and verdigris. Will see how these pan out in the next month or so.
  • Figone. Not only does Jérémie Bonamant Teboul have a nice line in figures, but his painting is incredible, basically flawless, and I just stood slack-jawed looking at the figures he had on display. Bought? Nothing, but I would like to steal Jérémie's ridiculous skill for this hobby. What a talent.
  • Infamy. Backed this on Kickstarter, and followed up with a few additional purchases on the day. The man behind it, James, is a bundle of enthusiasm and willpower and it shows in the range he's pulled together.
  • Forgeworld's queue. Considering the two limited edition figures on offer weren't that hot, the permanently long queue just to reach their stand was highly entertaining. I'm sure if you had a specific requirement, or wanted early releases, it was worth the while - but that didn't look fun standing there. I felt sorry for traders within two blocks, as it killed access to a few of them.
  • Studio Miniatures. Whole unit of Nazi zombies packaged in a VHS box to look like an old war movie and for £13? Sold. Wonderful concept and well executed.
  • Blight Wheel. Seriously loving the Sino Russia range of figures, but played safe and just picked up Dimitri and Ivan to play with, then ... spotted the Hell'ington standard bearer and got that too. Would have liked more, but didn't want to blow the budget on a single stand!
  • Infinity. Hadn't paid much attention to this game previously, but have seen a number of well painted figures for the various factions - but it overwhelmed us a little at the show how much of everything there is for this game. My friend's now the proud owner of the starter set, so no doubt that will see action in the coming weeks. Full marks to Troll Trader for lowest overall prices on the big ranges.
  • PRODOS. Their online store is as unfriendly as their figures are amazing. Persevere with the online bit, because the range is worth it. I'll be picking up the Dark Legion range when time and budget allow - and they've got a talented set of painters too.
  • Freebooter Miniatures. Probably the prettiest, painted full range set of display miniatures we saw on the day, and in an ideal world I would have brought them all back. Didn't buy anything, but seeing their highly skilled sculptor, Werner Klocke, dressed as a buccaneering pirate made my day.
Obviously that wasn't everything, just the handful of store highlights from my perspective. The hardest part of the show was picking the stands I could justify spending money on this year, and the silver lining was starting to build a list for the coming year.

Other things that occurred ... someone was dressed and looking uncomfortable as a 10 foot Space Marine, Stormtroopers were walking around - but they looked a little short to be a stormtrooper to me. Rick Priestly was there talking up Antares. I was very grown up and didn't run over to bear hug and thank him for a postcard he sent in reply to a rule query that age 12 me wrote to Games Workshop in the late 80s. That's restraint, right?

See you there next year.

Sunday, 19 April 2015

Star Wars: Imperial Assault Probe Droids

With the recent spark ignited by the Battlefront & Episode 7 trailers, a friend with the Imperial Assault board game (similar to Descent) entrusted me with painting up a couple of the figures.


The game doesn't quite work the same way as Descent, so there isn't a master unit in the group - they're simply required to be distinct from each other, hence the different coloured bases. The three are painted in different styles, but all sprayed metallic as the base.
  • Blue had his top half painted in chipping fluid, painted black, then scrubbed back. That's a technique which requires significant more practice (my first attempt) and wasn't great.
  • Green was shaded and highlighted as normal.
  • Red was shaded, drybrushed then I tried for a lighting effect around the sensors. Not entirely satisfactory, but conveyed the effect.
All three were finished with gloss varnish on the black sensors painted to give the feel of glass - and I'm happy with that.

In review, the standard approach used on Green is still my favourite - but the purpose of the other approaches was for comparison to see if there was a quicker, more effective method. Original is still the best and my preferred way of doing it.

Original is still the best and my preferred way of doing it, the others felt like shortcuts that save no time.

Saturday, 11 April 2015

Warhammer 40k: Gretchin

Gretchin done. Family group shot for posterity, just missing the final matte varnish to seal in the red pigment. Haven't quite worked out how to get the right focus on such a broad spread of figures, but hopefully it conveys everything.


Rummaging through old boxes, I found a couple of old painted Runt Herders so rebased them and added to the group. Happy that my painting has moved on in the last 12 years from what was my best possible painting at the time to a little below my tabletop standard now. Yay for visible progress :D

Loving pigments to finish off bases, but learned that you should leave it until the very last minute to apply - because that stuff goes everywhere. On a personal note, it was pretty cool to work my way through a 20 man unit in under six months. My previous Orks and Space Wolves have taken significantly longer as I got caught up trying to make them perfect - which negates the purpose of big units. They need to be painted and on the table, and not to Golden Demon or Crystal Brush standard - which I can't paint to anyway :) Sometimes "that'll do" is just fine with a paintjob.

Next project is a couple of Abominations for a friend's Zombicide game ...

Wednesday, 1 April 2015

Warhammer 40k: Gretchin

Over on the Ammobunker, March was Green Month and that got me hankering for Orks. Once I started hankering, I started reminiscing and next thing you know I've picked up this box on eBay ...


Very, very excited. Fond memories of buying this at release back in '87 for probably the princely sum of £10. Delighted to snaffle it as a bargain with everything mint. 1987 saw Terry Waite captured, British Airways privatised(!) and Maggie elected for her final term in office.

Considering how long ago all this was, before diving in and ruining these beautiful miniatures, I've pulled out a box of Gretchin to practice on ...


Also found my very old Goblin Green spray in a can. Not quite the shade of green I'd used previously on my figures, but it'll do for a quick and cheap unit like this.


After realising there was no chance of completing 20 Gretchin in one week, I opted to switch focus to just completing a couple of test models instead. Would rather have something completed to show for my effort this week.


Craquelure effect on the left hand gun is accidental. Think I applied matte varnish when it may have been be a smidgeon wet - not something I've seen before. Long-term I don't expect to have cute little red noses on all of them, so the effect will be broken up when in a bigger group. Eyes are painted red, but slightly higher camera angle means they're lost in the shadows. Barrels aren't drilled, as for metal miniatures I find it tedious for so little gain.

Brambleton got me thinking about the bases, and I've opted to re-base in line with my Ork army - so it's polyfilla with a few items stuck in them, sprayed black then drybrushed up with greys. These guys got a heavy dose of Vallejo weathering pigments to the base, feet and bottom of the loincloths, as I'm keen to fiddle with the stuff. Weathering pigment that is, not an Ork's loincloth ... ahem.

The remaining 17 are still on the bench at varying stages of completion while I work out how to make them distinct from each other.

Sunday, 29 March 2015

Cthulhu repurposed

Cthulhu Patriarch Genestealer Bob is finally finished up, along with mini-Bob. Painted as a gift for a friend who loves his eldrich games with old gods, but wanted something different to the usual murky greens for the Great Old One.


Dropped the tripod for this shot and took it from workbench level against the black backdrop or it's hard to get the sinister browline. Opted not to paint black into the recesses, but leave those in blue and highlight up instead.

More fiddling with techniques on the highlighting and almost got to a happy place with the layering, so hopefully a bit of progress on the next one to improve further. His mini-me was a cheeky drybrush with the highlight colour and shade with Leviathan Purple on the skin.

Think the wet palette is starting to make sense too. I've got to learn to be less prissy about letting paints mix into each other and loosen up on control, it sort of naturally yields the colour mixes I want for the highlights - but it pains my orderly soul to watch all the colours just muddle into each other. Quite good fun to play with, mind.

Monday, 2 February 2015

Space Hulk: Objective Marker

Well that escalated quickly. Space Hulk objective marker finished already.

The base is simply a placeholder to put the figure on for a photograph. In-game it won't have a base - or I may use one an industrial bases from the CMON Kickstarter ... whenever they arrive.

Usually I wouldn't bother with a rear shot, but the back of the chair is so wonderfully detailed.

Camera shots magnify all your flaws in the most wonderful way. Obviously I'd swear the red/orange layering was flawless IRL, but patently that's not the case ;)

Still playing with metallics, but feel like I have a little more control of them - although the verdigris did get a little out of hand, but no matter! All the wiring on the termie is dull greys/blacks as the reds and purples were already quite a barrage of colour.

Think I've missed this as a hobby, it has proven exceptionally relaxing over the last two weeks.