Thursday 31 December 2015

Infernal Golem of Kashan Vra

This is cutting is close to the wire, but my final finished figure of 2015 is here! For the life of me I couldn't get a decent photo*, but with time constraint today of getting it wrapped to meet my goal of at least one miniature completed every month ... it'll do.

* But in the words of the immortal Bucks Fizz, the camera never lies.


He's a beast of a figure, and ridiculously unbalanced weight wise, which has caused me a few problems. I've taken him off his base while I think about how to base to offset the front leaning pose that's causing the problem. Why no shots of the feet? He's stuck onto a Guy Garvey CD with blue tack in the best of makeshift "basing" :D


I've tried to make it look like the glow from his eyes is reflecting onto spots on the horns. I know it's crude not quite right, but it's a learning for the future ;)


I had a bit more fun with the OSL and tried to have it reflect back off the axe heads onto the body of the figure where appropriate. I need a lot more practice of this technique, but it's good fun.


In hindsight, I think the sculpt's lovely but the kit itself is a little disappointing. The production method used has left odd striations on almost every surface - most noticable on the horns and axe blades - and almost no surface is perfectly smooth as I'd expect from a high-end resin kit. There's quite a bit I know can be improved but by yesterday I'd hit a wall of wanting it done and off the painting desk, but it took me far outside my 28mm figure comfort zone and encouraged me to try a few new techniques and that's no bad thing. More importantly, that concludes my first year back into painting after four years out of the hobby and I'm glad to be back.

Thursday 24 December 2015

Infernal Golem and painting glowing blades

So, I got ahead of the Christmas wrapping curve, and was able to make a little progress with the big man today. While I remain undecided on how to proceed with the blades, I did manage to reach a happy mid-point where it's not pure black, and does echo the greens of the embedded stones. I realised they put me in mind of warpstone from Warhammer Fantasy, so have proceeded to paint the blades as though they'd been fashioned with that same magic. A flying step-by-step for how I got the effect.

Basecoat the blade with Dark Green, then a dark brown wash into the recess

Drybrush with Goblin Green then Livery Green along the edges

Smooth down with a Dark Green glaze

Go bananas with the rust effect to see how it looks ...

Glue the damned thing together, even though it's not finished.

Still quite a bit to do, but it's nice to see the model taking shape and I'm happy with the progress! Alright, it won't be winning awards but I've had fun painting it :D Needs highlights adding back on the metals, but now I'm undecided whether to stick with the blades as is, or crack on with the original plan ... I may wuss out for the time being and leave it as is. Once finished and matt varnish is applied, they could benefit from gloss varnish being added to give an onyx-like feel.

As I've kept the OSL quite soft on the stones, despite their size, I'm not sure how much I'd apply from the blades back to the body, but will chew on it over the festive season. Also - now it's assembled I've realised that the weight of this figure is an issue. It's unbalanced and leaning forward heavily - which is how the sculpt requires it assembled, but now I need to counterbalance at the back to stop it tipping over.

Progress now paused for a few days, so Merry Christmas one and all!

Wednesday 23 December 2015

Infamy: Welcome to The Big Smoke - unboxing

While it's a slow month on the painting side so far, it's a great month for procrastination, sorting and filing miniatures and receiving Kickstarters. Chief among them has been the delivery of my Infamy Big Smoke order from the middle of last year. It took a while to arrive, and was a good six months past the originally anticipated date but was well worth the wait. I finally got the chance to sit down and catalog the pieces before assembling and priming ...


The detail on these figures is fantastic across the range, no matter the sculptor, and they've left me in the same wonderful and terrible position that Guild Ball did. I have a set of supremely detailed figures that I'll never do justice to paint-wise. It has given me an appreciation of the talent of folk painting them to such a high standard. I was impressed by Megazord Man's output before I had hands on the figures - but now I've seen the size of them, I don't even know how he can pick out that detail by eye - let alone paint it so beautifully.

Regarding Infamy themselves, they ran a great campaign, and had regular, informative updates for the backers and I'd consider backing subsequent campaigns. Well, once this mountain of resin is painted ...

Tuesday 22 December 2015

Infernal Golem and OSL

With a little mojo returning in the run up to Christmas, here's another update!

Good times.

Following a lovely little glowing eye guide by jah-joshua, to achieve that lovely object sourced lighting effect (OSL), I didn't have quite the same colours, so a spot of improvisation required ...


I've done the Golem's eyes and the warpstones powering him, and find myself very happy with how this effect has turned out.

But do you see the Xbox logo in there too?

I think my Golem's powered by Microsoft ...

There's green inside the upper jaw, as I'm doing the effect inside the mouth to show the glow coming from inside the creature's workings.

Looks a bit wafty right now, but will be fine once the lower jaw's attached.


In parallel, I've been working on the hands and weapons ...

Coupled with the verdigris around the eyes, it gives a little personality to the axe heads.

However ... as there's already so much metal, I was thinking that the axe blades could be stone. Thoughts?

Monday 21 December 2015

Infernal Golem progresses

Doesn't time fly. Some painting progress has been made, with only the metal plates remaining reasonably clean at this point. He's shaded and verdigrised to heck at this point, and had the good fortune of a head being added. The slightly 'off' join on the neck isn't an issue as there's a metal beard to be added which will make that go away.


It's possibly hard to tell compared to the last photo further up the thread - so here's a side by side comparison. Arms are in progress to the same stage but not added, because it all overlaps quite confusingly and makes detail work tricky for me.


The inner workings received a coat of AK Interactive Rust Streaks, then I pulled off the excess with cotton buds. Haven't used this before, but will be doing so again. You may cry "he's ruined it!" at this point, but actually I'm really happy with how its turning out - the colouring is a little more severe in the photo than real life, and pleasingly uneven. It looks like an unloved machine that hasn't been looked after - and may be a little pissed off by this.

Deciding on how or even whether to apply rust onto the exterior metal plates. I think I should, but any thoughts or comments for more experienced weathering wizards?

Last up, a recently backed Kickstarter project - the Basius series of molds to apply your greenstuff to for custom bases. It'll be a little while until they get a run out, but they look the business and the project was well run - even if the project page was laid out like a Geocities escapee :D


But they stack oh so neatly!

Monday 30 November 2015

Guild Ball Fishermen: Greyscales

Not as much painting over the last week, but did manage to get a few games of Rum & Bones (still love it) and my first run through with Rise of the Kage (it's a grower).

However, still made it in time for the end of the month with Greyscales.


Bit of a basing nightmare when I accidentally snapped the pin in his foot, so had to throw him on a last minute replacement. So yes, the base still needs a little tidying.

Played around with trying to do better skintones, and my first play with the Tamiya Clear Red on the blade - need more practice on both, but we're getting there.

As an aside, funny that this chap's got an armour rating of 0 in the game. Even if I'd done the rope on the cloak as actual rope and not a chainmail effect, he'd still be carrying significant protection with that and the shoulder plate, yet he gets no bonus in game! Go figure.

Next week should see the Golem progress, but a brief pause now as tonight sees an evening out to enjoy the melodic stylings of Slayer & Anthrax.

Sunday 22 November 2015

Infernal Golem and Greyscales

Progress made on the Golem this week ...


Shading on everything and a little highlighting on the copper now. One thing I've done differently is think about where the light could catch once head and hands are on, so shoulder plates and chest have had more highlighting than other areas. The difference isn't enormous, but I can see it and it feels right. Next up is tidying some of the messiness of my painting then the verdigris, then I can work out how the rest of it fits together.

The body alone measures 120mm and I haven't fitted the head yet, but think it'll put him about 130-140mm when done. Comparison body shot versus an old Terminator for scale ...


Here's a shot of Siren (again) but with the back on display as well ...


With hindsight, I'm tempted to go back around the edges of these base inserts and paint them black as the unevenness of them poking out is irking me. I've also made a little progress on Greyscales for my Guild Ball Fishermen's team so he's now the proud owner of eyes ...


This month's goal is to wrap the big fella and Greyscales, and there's a week left for both. No pressure, right?

Monday 9 November 2015

Guild Ball, Infernal Golem and bases

I've finally decided Siren's finished.


But ... am I happy with it? No. I realised if it isn't at least painted up and on the table, it could be an eternity before it makes it there. Face still bugging me, and after looking back - the browns are far too similar and run into each other. Upside? Hair better than it was, and after taking advice I went back to a light brown then worked up - sadly it's a little too far into white for blonde now and gone full Rogue (movie version) but that's alright - chalk it up to happy accident.

Sash around the waist was a pleasant success for my first attempt at wet blending in quite some time. However, she'll still look ace on the table ... so on to the next one!

Well, almost. My attempt to procrastinate finishing off the rest of my Guild Ball Fishermen has been going well. This is a figure picked up at Salute this year and it practically fell onto the painting table. It's a brute of a piece and a manufacturer I wasn't aware of before the show. Behold the Infernal Golem.


All cleaned up, and boy there's a lot of pieces here. Needs to think about what to do with all this now, some dry fitting and planning required.

To pass the time, I've finished up a set of the CMON bases from a Kickstarter - love these!


They'll sit patiently on the side to be used when adding more civilians to the earlier Colony 87 set. Nice to get them wrapped while I remembered the colour choices from the last time.

Monday 12 October 2015

Colony 87: Finished

New job at work is kicking my arse, but think it's finally settling now.

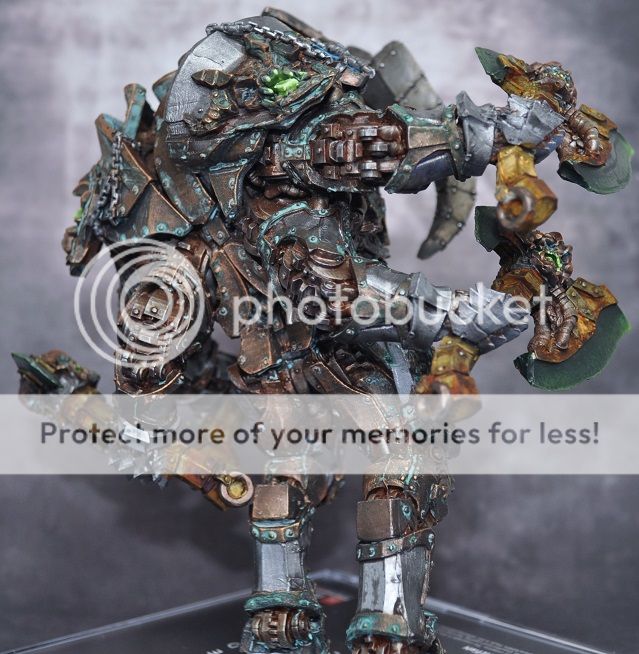
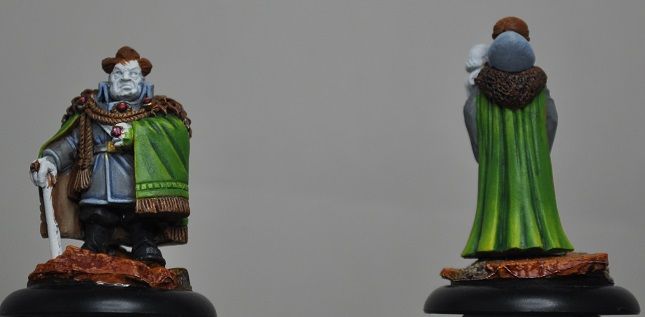
I started painting Barcoon and he reminded me of Barons Greenback and  Harkonnen in equal measure, so he's got a slightly worn and tatty primary outfit with brown hues, and the accessories almost thrown atop to give a veneer of respectability when presenting himself.

In line with the thinking of trying something new on each project, my experiment with this set of figures is trying different directions with same colour on characters, so his her their skin and golds are from the same base colours as the Lord & Lady, but greener and colder respectively.


Happy with how he turned out, and a little less of the Dangermouse villain about him, but still some things to improve as usual ... thought the cloak was better than it looks under the unforgiving lens of a camera, but hey ho! One left, then that's the set of six wrapped. Which is just as well, as a few recent Kickstarters have landed (Rum & Bones and Rise of the Kage) and that's added an awkward 300+ miniatures to the backlog. Whoops.

Alexi is the one I couldn't "get". Lovely figure, but it didn't click for me while painting, but then it did. He's the first figure I've put a brush to in about a month. Usual notes that there are things I could improve here - but the robes ended up how I imagined Barcoon's originally coming together, a lot smoother. His helmet is a lot cleaner than the rest of him as I pictured that being critical to his adventures, and liked the idea of the old, gold astronaut visor. Plus it gave me an excuse to say helmet. Heh.


I painted eyes on the man too. EYES! Traditionally I'm very bad at them and avoid whenever possible, but these didn't come out too bad. Still room to improve, but they're actually recogniseable as eyes.

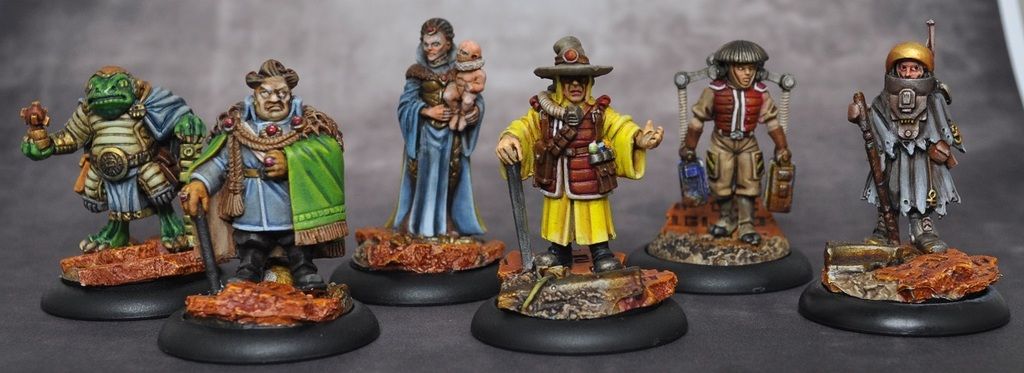
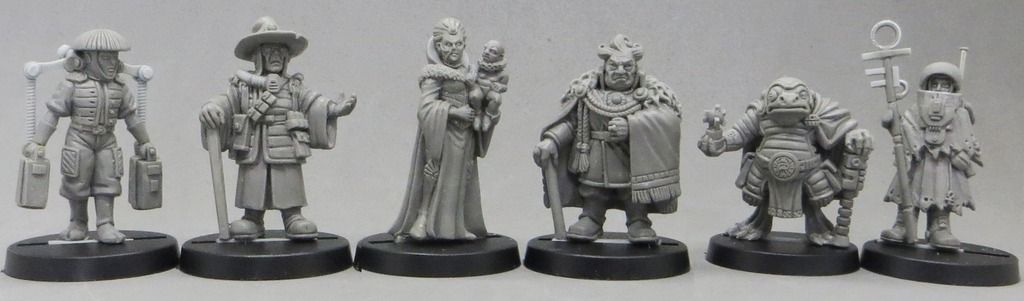
For posterity, here's a group shot of the finished six figures.


These were a huge amount of fun to paint. Huge. I may have mentioned this over the last couple of months. Lovely sculpts with bundles of character and a very enjoyable painting experience. I got to try out a few different paint schemes, and used a limited palette across the six - with the same blues and greys appearing several times in different forms, and try out fresh techniques on each, including getting back into layering and glazing, which is probably my favourite way to paint.

One of the nice parts about smaller miniature ranges is the focus on the figures and lack of backstory and reference pieces. The traditional "oh it's a X, I'll paint in the usual X colours" goes by the wayside - which makes it hard for someone like me who is lacking in creativity.

I'm also relieved that it's a project completed. They're rare and to be appreciated. I have a couple more sci-fi suitable civilians that would be handsome additions to this set, but for the moment it's time to return to Guild Ball and get my Fishermen moving.

Which brings me back to Guild Ball ... my poor Fishermen waiting patiently while I was sidetracked - so off we go again! Suggestions on how to remedy Siren's terrible hair colour? I was aiming for a pale, ash blonde but it isn't right at all.


Monday 24 August 2015

Colony 87: WIP #3

And lo, risen from the flu-ridden grave I found myself in last week - I finally finished up the Lord & Lady Greiss.


Lord's sash ended up cream, and it works very nicely across the middle against the barrage of colours elsewhere. Sits well with the quieter martial uniform, and against the gaudy jewellery and ostentatious robes he's given himself. I wanted the Lady and her child to look a little otherworldly so they got a touch of the Fremen which unintentionally ties nicely to the robes.

Next on the painting table? Finishing up the last two of the Colony 87 set with Barcoon Krobosh and Wandering Alexi have a little early painting action.


Let's take a moment to talk about poor Alexei. Having made the journey from manufacturer to me without his very fragile staff breaking, he suffered an accident during the pinning process and is now missing the top half of the staff. Oh the shame. Then I realised it actually fits quite nicely with almost all the other characters having a stick of comparable length - so haven't (yet) made an attempt to stick it back on.

Wasn't sure I'd get anything finished this month, so to get two figures wrapped to my satisfaction was very pleasing. Here's hoping September sees an upturn in output - but even at this stage I think it's now my most productive painting year ever and that's down to the One Mini A Month challenge spurring me on. Hooray!

Sunday 23 August 2015

Building a Wet Palette

I came to the idea of a wet palette this year on my return to gaming, and have found it invaluable for day-to-day painting. As a friend is starting into painting, and itt seems no two palettes are ever quite the same, here's my interpretation for his benefit.

Here's the components, and below is the explanation of key ingredients to make the palette:


Plastic tupperware container with a matching lid. Important, as when you seal it back up, the moisture now trapped inside cankeep your paints workable for a week or more.
  • Sponge. This is a simple car sponge from Halfords that I cut into upper and lower halves. My irregular cutting is then hidden because you want the smooth surface uppermost.
  • Kitchen towel. Highly absorbent and offers the baking parchment better support than just the sponge.
  • Baking parchment. Cut to size - ideally a little smaller than the container size. The one in my illustration is a little too big.
  • Sainsbury's strawberry & vanilla ice cream cone. Probably THE critical item in the build. You'll know when the moment arrives.
Late addition to the article. As good practice, and I was reminded by the first poster on this article (thanks Brambleten) you should look to replace the kitchen towel and tower on a weekly basis. It can fur up with mold, and you want to keep this clean with fresh supplies to ensure it has the best lifespan possible.

Onto the compilation of the elements ...

  • Fill the container with water to almost the brim, put the sponge in and soak up as much water as possible. Once the sponge is at capacity, I tip away some of the excess so around the corners it's only up to the top surface of the sponge.
  • Put the sheet of kitchen towel over the top and watch that absorb some of the excess. Tuck in the corners for neatness.
  • Place the baking parchment on top. This will be a barrier to the water below, but will benefit from the moisture and keep the paints.


That's it. Wet palette made.

I can't disclose at what stage the ice cream was eaten. This is only something you'll be able to determine from a couple of dry runs of your own.

Sunday 9 August 2015

Colony 87: WIP #2

In the words of Granny Weatherwax ... I ATEN'T DED.

Being back in work after a little time off on paternity leave has been a killer of the brain and free time, but nearly back to normality - or thereabouts. I've started to try and improve blending and layering on figures and another of the Colony 87 figures was just perfect to work on - Lord Greiss' cloak.


Now I have a problem! He's wearing a sash and I'm stuck on what colour to paint it. Happy with my other colour choices - military grey outfit and ostentatious green and gold cloak but what colour should the sash be? While quite a minor item, it's noticable because it's right in the middle of the figure.


I had planned to make the jewel settings gold and the jewels red, and wasn't sure if the sash should use one of the existing colours (green or red?) or be another colour. I'll be trying out a cream and see how that goes - think it will fit well against the cooler greys and reds of the gems.

A little more progress made since these original shots, Lord's cloak, gems and metalwork are finished up and his consort, the mysterious Lady Greiss has a cloak in her Lord's colours and a fur collar.


These have been unusual figures for me to-date as I've painted individual elements to completion, rather than my usual plan of all the basecoats and then back to the shading & highlights. Apart from a solitary, accidental touch of gold from the belt buckle onto the jacket piping on the Lord, I've been considerably neater than normal which was surprising! Maybe there's something in this approach after all ... it does feel like I have to concentrate a little more and yields a better result.

As the brain's not up to too much complex painting at the moment, my background job this week was to start painting up the other bases in this set, along with all the resin inserts and balls for Guild Ball ...


Anyone telling you that I don't know how to live a rock'n'roll lifestyle is clearly fibbing.

Thursday 23 July 2015

Colony 87: WIP #1

So, I've temporarily paused work on Guild Ball as the active project to allow myself to be sidelined by the Colony 87 figures. Too excited by them to put on hold until existing projects are completed and let the enthusiasm wane.

Preparation work all done so they're primed and based with the CMON bases, and choices were adjusted with to allow better positioning of the feet. It's possible to cut out some of the basedetail to anchor them in place as it's only resin, but I wanted to try and find a natural position for them - and did! Very pleasing.


Each figure has been pinned through both feet, as I wanted to keep them well anchored - they're heavy and I wasn't confident superglue alone would retain them. Only minor damage to two feet and once painted you won't know who it happened to. Promise.

For basing, the original colours from the Kickstarter were as follows: The picture is very helpful as a reference piece to determine what's rubble, wreckage and stone work - as my eye for detail on fine casting is shocking. As these pieces won't be going into 40k, I have a little more freedom to pick out different colours and plan to do more metallics than the comedy Tau colouring on everything.

To recap on the excellent Colony 87 figures. They essentially come in two pairs: Pash Grolin and Kay Dee, then Lord-Governor Manduc Greiss and Lady Greiss & Creaster. Then one not-pair of Barcoon Krobosh and Wandering Alexei. At the time of writing, I've only seen painted versions of Lady (link) & Lord (link), Pash (link) and Barcoon (link). No love for Kay or Alexei yet so ... work has started on Kay and Pash to rectify this. Think I may give Pash a metal walking stick instead of a wooden one and just having the carry cases on Kay as silver feels a little boring - but getting an idea of what they look like now.


But then with a little burst of enthusiasm, suddenly I have them finished ...


I've tried to use the red jackets with white piping to tie them together, but then dampen the colour choices on Kay to represent him working for Pash. Conversely, Pash as a the man of trade deserved something a little more flamboyant, so I've used yellow for his robes - this is a lot bolder and brighter than the dirtier yellow on my Genestealers and both of them are clean and well presented. The only things in poor condition are the trading boxes being carried by Kay.

And a shot of the bases to show the detail a little better, albeit a wee bit blurry. Terracotta base, mix of terracotta and orange over that, shaded in to the alien lettering then some detail picked out in orange - and we're done!


Can't remember the last time I sat down to start painting a figure and a) felt compelled to try and get it finished in its entirely and b) had the time to achieve this. Very pleased with myself. *purrs quietly*

Monday 20 July 2015

Colony 87: Introduction

My favourite thing at the moment is the arrival of Jon Boyce's new Colony 87 figures from another Kickstarter. They hark back to the Rogue Trader mindset of sci-fi, where not everything and everyone needed to be shooting someone, or grotesquely muscled, and really captures the futuristic civilian feel.

(images nicked from the Kickstarter and joined in sequence, as his photos are better quality)

From left to right, they are Kay Dee, Pash Grolin, Lady Greiss and Creaster, Lord-Governor Manduc Greiss, Barcoon Krobosh and Wandering Alexei. Look on the Kickstarter for a little more detail.

Worth noting that it was funded mid-May, and delivered end of June/early July - basically on schedule. Kickstarters are notorious for being delayed, so it's very pleasing to see smaller operations like this do well, and I look forward to backing more of them in time.

I've paired mine with some of the Tau Ceti bases from the CMON Kickstarter mentioned previously, and longer-term would like to build a fuller group of non-combatants. Maybe as NPCs for our soon-to-start RPG adventure in Star Wars: Edge of the Empire. Perhaps they indicate a crashed starliner that was carrying people between planets and we find the survivors making the most of things on a new environment, or whether it's a planned, established settlement. I haven't decided what my approach to Colony 87 is. 


Hopefully a second wave of Jon's figures will be forthcoming later this year, as he has stated preparations are already underway. I certainly hope it comes to fruition because the quality of production and sculpt is excellent. Feel free to throw money at him, as the team he assembled to make this happen is clearly a bunch of talented souls.

With my hat of optimism on, I think it's a wonderful problem to have so many beautiful models to paint, and only being limited by the free time available to me.

Tuesday 14 July 2015

CMON Base System

A wise man once said "Kickstarter projects, they're like getting a little present from Past You to Future You" and in the last couple of weeks, Past Me has been a very generous soul and bought Future Me a few excellent things.

CMON produced a range of resin bases with Micro Art Studios and if you've ever wondered what 272 resin bases bagged up looks like, then wonder no more!


(You also receive the bases they fit into, but those are standard and boring so not included in the shot)

Quality is great, and I'm very happy with them. Estimated delivery date of February '15 was missed by a good four months, but if you go into a CMON Kickstarter with the understanding that they're flat out lying on delivery dates then you won't be disappointed with the actual goods when they arrive.

Each style came as 2x 50mm, 12x 40mm and 20x 30mm which is a handsome set and enough to base an entire skirmish warband in some games. Cost of these? Including shipping to the UK, they averaged at 40 pence per base - making no concession to the different sizes. That equates to £13.60 a set and feels good value, especially when a glance over retailers indicates I could get the equivalent Tau set for £41.36 on "discount" - which would be too rich for my blood.

If I work out how to use this lot up in the coming months, then I'd happily back a second wave to get more. Well done Past Me, you did a good thing.